What's new in Inventor 2015
Autodesk has just launched Inventor 2015, this blog post highlights the new features in this exciting new release.
To deliver an exceptional modeling experience, Inventor 2015 brings focused, impactful additions to the 3D Modeling environment as its primary theme. It also delivers a robust package of customer-requested productivity improvements throughout other work environments, for both new and advanced modelers. Included are tools for direct editing and freeform modeling creation, and faster ways to modify and create sketch relationships
Engineering design productivity
CAD file conversion & compatibility
NEW
Edit geometry directly
INVENTOR, INVENTOR PROFESSIONAL
Easily manipulate native or imported geometry. (video: 1:32 min.)
Heres even more!
Direct Modeling | Learning Experience | Workflow Enhancements |
|
| Multiple enhancements to:
|
Modeling is easier with Direct Edit, Freeform, and Sketch
Direct Edit
Parametrically move, size, rotate, and delete imported solid models or native Inventor files:
- Quickly and precisely change parametric/feature part geometry in models with complex histories.
- Change imported base solid data.
- · Before you commit to redesign, explore the possibilities. Explore the redesign of parts in the context of the parent assembly. Align geometry on the active part with geometry from other parts (nonassociative).
Freeform
Use this flexible modeling approach to explore and create freeform shaped models using direct manipulation. You can edit Freeform shapes at any stage in the design.
- Combine Freeform tools with existing parametric models, and incorporate freeform modeling when the design dictates. Use the Freeform Match Edge command to modify a freeform body to match to an existing model or sketch geometry
- Perform concept modeling with the new Freeform tools. Create rough shapes where size and shape are not yet established.
New constraint tools and settings
Get your sketches into shape faster and more easily. The new Relax Mode improves productivity to modify geometries that are already constrained. Experience greater control over constraints with improved display, inference, and delete options.
One new command called Constraint Settings provides access to all of the 2D sketch constraints-related settings.
Improved Start Up and Learning Experience
The new learning experience environment and tools all combine to make learning easier and faster.
Inventor Home functions as your personal dashboard and provides a single central location to start or edit files, and to access your learning and help content.
Team Web access is available from Inventor Home. Use Team Web to provide links to the content of your choice.
Tutorial Learning path is also available from Inventor Home. The new tutorial path guides you through the most common workflows to provide a solid foundation of skills. The new interactive tutorials in the path cover the basics of Sketch, Parts, Assemblies, and Drawings. Engaging challenge exercises promote in-depth learning.
Improved Search keeps you productive. It places all of the rich content provided by Autodesk at your fingertips, quickly and easily. Search Preview displays results for Commands, Help articles, Support content, Discussion Groups, YouTube videos, and Blog posts.
Workflow Enhancements
Among the many enhancements, are:
Parts
- Twist angle is added to Sweep.
- Standard tap depth is available for holes.
- Enhancements to parameter dialog boxes.
Assemblies
- Enhancements to Joints include: offset origin, select virtual midpoint between two faces as a joint origin and align to work geometry.
- Frame Generator now supports Member Reuse.
- You can create work planes between two parallel or non parallel planes.
Drawings
- For annotations, you can double-click anywhere on a balloon to edit it.
- Move a split table to other sheets.
- Creating drawings with large Assemblies is faster.
- Create foreshortened (linear, angular, and arc length) dimensions.
Keep reading for the details on all of these great enhancements and more.
General
Autodesk Application Manager keeps you current
You can easily stay current with the latest updates for your installed Autodesk 2015 applications and Suites. Application Manager actively surfaces alerts about new Service Packs and other important packages as they become available.
When you decide to apply an update, Application Manager seamlessly downloads the files from the cloud, and installs them on your machine.
For more information, open the Windows Taskbar in the lower right corner and right-click  . Select Open. In the Applications Manager dialog box, select Help.
 . Select Open. In the Applications Manager dialog box, select Help.
Application Options dialog box is now resizable
Select any corner of the Application Options dialog box to resize.

Exciting workplane improvements make modeling easier
Take control of workplanes: You can now rename the workplane in the browser.
The name of the workplane now also displays in the graphics window.
Create midplane work planes from parallel or non parallel faces
Using Plane on the ribbon 3D Model tab, Work Features panel, you can create a midplane work plane between two parallel or non parallel faces in a part or assembly. In an assembly, it is required that the faces be on separate components. The resulting work plane is oriented to the coordinate system, and has the same outward normal of the first selected plane.
Enhancements to the ribbon
Simplification of the 3D Model and Sketch tabs
The ribbon is simplified to display by default the most commonly used commands. This enhancement reduces clutter and makes it easier to get to the most frequently used commands. Here are the highlights:
- 3D Model and Sketch panels streamlined
Several commands were moved from a main panel to the subpanel, or to a drop-list on the panel. For example, in a part file (.ipt) the Modify panel on the 3D Model tab is now streamlined to display fewer commands by default. The other Modify commands are moved to a drop-down menu or to the Modify expanded panel:
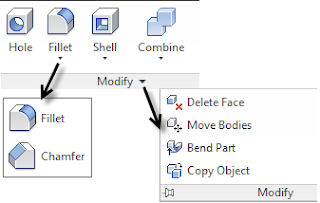
- More panels hidden by default
Panels with less frequently used commands or commands with duplicate access points are hidden to optimize space in the workspace. You have more room to view and work with models. For example, on the 3D Model tab, the panels Primitives, Parameters, Measure, Plastic Part, Harness, iPart/iAssembly, Simulation, and Convert are now hidden by default.
- Access hidden panels using the new Show Panel icon
You can access hidden panels easily, and make hidden panels visible. Click Show Panel , and then click the panel to expose on the active tab.
 , and then click the panel to expose on the active tab.
- Sketch tab always available
The Sketch tab is now always available on the ribbon in part (.ipt), assembly (.iam), and drawing (*.dwg/*.idw) files. Also, the Draw panel is renamed to Create when you are in Sketch mode in a Part (.ipt) file.
Additional Ribbon enhancements
- New Button resize option provides more flexibility
Right-click a command in the ribbon to access Button resize. You can set buttons to display as large or standard. With this button size control and the ability to ungroup buttons or hide and rearrange panels, you can optimize the ribbon to the way you work.
- Access Help for customizing the ribbon
For help on the different ways to customize the display of the ribbon, press F1 as you pause the cursor over the new Show Panels icon.
New setting on Application Options – Hardware tab
The new setting, Conservative replaces the Compatibility setting on Application Options – Hardware tab - Conservative provides a scaled down experience of the Quality and Performance settings.
Autodesk 360 is now an installation option
Autodesk 360 lets you connect your Autodesk product with Autodesk 360 web services, and gives you the option to synchronize your online files with your local computer.
Autodesk 360 is now available as a shared component in the installer. It can be deselected to prevent its installation, or it can be installed in a disabled state, to be enabled later.
General Modeling Improvements
Performance Improvement in Wrap to Surface/Face
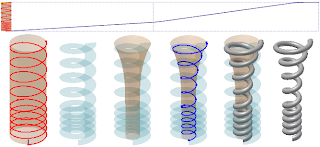
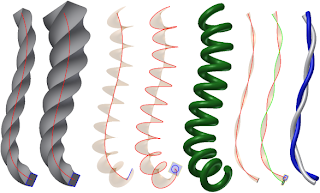
Dramatic performance improvements are made in Wrap to surface of Project Curve to Surface, and Wrap to Face of Emboss. In the following example of a custom spring, the sweep operation in Inventor 2015 is 50 times faster than in Inventor 2014 since Wrap to surface creates the custom helix curve as a lightweight, and yet more precise, curve. In this example, the file size is seven times smaller.
Modeling Robustness
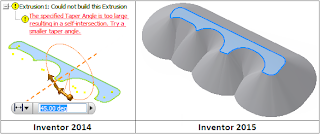
The robustness of Shelling and Tapered Extrusions is improved. They now handle more complicated geometries. For example, in Inventor 2014, you can extrude the following profile with proper tangent constraints with a taper angle of up to only 27 degrees. In Inventor 2015, the taper angle can be anywhere from 0 through 90 degrees.
Part
Model with Freeform
The 14 new Freeform tools provide an alternate modeling approach to explore and create freeform shaped models using direct manipulation. Start with a freeform shape (Box, Sphere, Cylinder, Torus, or Quad ball) that best represents the desired geometry. Then use the freeform edit tools to change and adjust the shape.
Use freeform along with parametric modeling to create a more visually compelling design.
Direct Edit
Edit parts quickly with Direct Edit. You can adjust size, shape, and/or location of model features by directly manipulating the geometry. Use Direct Edit when you want to:
- Quickly modify a complex model that you did not create originally.
- Modify imported base parts.
- Easily modify only what you choose while avoiding unintended changes due to complex relationships.
- Rapidly explore design alternatives.

See enhanced highlighting of selections in iPart table
Your selections in an iPart table highlight in other reference fields, and in the graphics area.
The object (such as feature, parameter, property) that you select in the iPart editor highlights within associated table fields and in the graphics window (when applicable). This feature makes it easy to locate and change selected objects when there is large amount of design data in the iPart.
Highlighting works for:
- Features in parts and assemblies, and sheet metal features such as a flange or a face, regardless of whether they are suppressed in the initial part.
- Work features, regardless of whether they are set to invisible in the initial part or assembly.
- iMates and iFeatures in parts and assemblies.
- A column or a cell, if it is possible for the owning feature to highlight in the graphics area.
- Columns that can be mapped back to a feature, work feature, or iMate.
- The source pane (left), and the destination pane (right) in the iPart and iAssembly Author dialog boxes.
- Edit in place, on the correct occurrence, but not for Edit in Place Create iPart.
Purge all unused parameters in one action
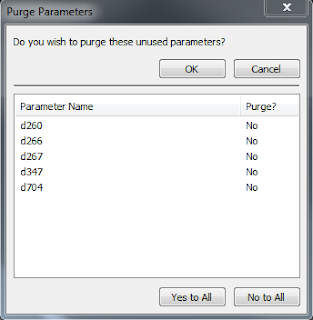
At the bottom of the Parameters dialog box, the option Purge Unused lists all unused parameters in a separate window. There you can purge them in one action. Click Yes to All to delete all unused parameters in the document or No to All to retain the unused parameters in the current document.
To retain a parameter listed in the window, leave the default setting of No. To purge a parameter listed in the window, you can click the default setting of No to Yes before you execute the purge. Unused, exported parameters default to No in case they are used in other documents.
You can still delete parameters individually in the Parameters dialog box.
Productivity Improvements in Parts
View entire parameter names in the Parameters dialog box
The width of the Parameters dialog box expands to display the longest name that populates it so that names are not cut off.
A twist angle controls rotations in sweep features
A new Twist option is added to the Sweep dialog box. You can enter a twist angle to control the rotations of the profile perpendicular to the path. The twist angle you specify determines how much the profile twists along the given path. Available only for perpendicular sweeps created in Inventor 2015 or later.
Default thread depth and hole depth value specified from thread.xls
Standards now control thread depth and hole depth default values. While creating a hole, you often apply a thread feature. The values for thread depth and hole depth reference the associated (new) Thread Depth and Runouts columns within the thread.xls.
Sketch
New constraint tools and settings
Last one wins with the new Relax Mode
You can use the new Relax Mode to modify geometries and apply new constraints to geometries that are already constrained.
With Relax Mode turned ON, when you add new constraints or dimensions, conflicting constraints are removed. You can modify constraints of an existing model by dragging the selected sketch geometry freely, even when they are already constrained.

You can remove all conflicting constraints except Coincident, Smooth, Tangent, Symmetry, Pattern, and Project by adding new dimensions or constraints. When you cannot add new constraints successfully, remove conflicting constraints manually.
Improved access to 2D sketch constraints settings
All 2D sketch constraints-related settings are reorganized into one new command called Constraint Settings.
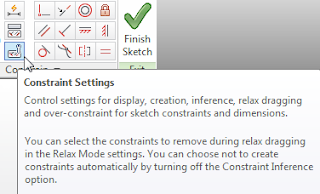
The new setting Display constraints on creation provides clear feedback on the constraint as you create it.
The new setting Show constraints for selected objects highlights constraints for geometry that you select in the graphics window. When displayed, you can select any constraint to delete it.
Delete Constraints and Delete Coincident Constraint
When geometry is selected, you can access the new Delete Constraints option from the context menu to remove all constraints. Delete Constraints does not remove Coincident constraints . You can remove coincident constraints with the Delete Coincident Constraint command.
Sketch Behavior Improvements
While creating sketch geometry, endpoints are created on the mouse down/click action instead of mouse up/release. Now it is easier to connect endpoints and close sketch loops.
Sketch Offset improvements
When you create sketch geometry with the Sketch tab  Modify panel
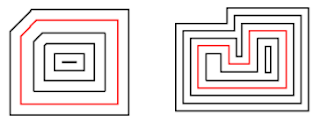
  Offset command, line, arc, or ellipse segments of the offset geometry are automatically removed as soon as they reach zero length. As a result, no flipped or degenerated geometry segments are created, and you can use wider intervals of offset distances.
 Modify panel
  Offset command, line, arc, or ellipse segments of the offset geometry are automatically removed as soon as they reach zero length. As a result, no flipped or degenerated geometry segments are created, and you can use wider intervals of offset distances.
The following illustrations show examples of geometry created with the improved Offset command. The original sketch geometry is highlighted red, geometry created by the Offset command with sample offset distances is black.
Productivity improvements in Sketch
Create point at virtual intersection of two sketch elements
You can now capture the virtual intersection between two elements in 2D sketch, and autocapture the virtual On Curve inference in a 2D sketch. The existing constraint inference for real intersect elements can be applied to virtual intersections as well.
Specify a text style when creating text in your sketch
When creating sketch text, you can now select from a list of available (active) text styles that exist within your document.
Look at behavior enhancements
Two new settings are added to the Application Options - Display tab:
Perform Minimum Rotation Rotates the sketch at a minimum angle to make the sketch plane parallel with the screen and make the X axis of the sketch coordinate system horizontal or vertical.
Align with Local Coordinate System orients the X axis of the sketch coordinate system horizontally/right positive, and the Y axis vertically/up positive
Assembly
Express mode improvements
- You can now edit parts and sub-assemblies in place without opening them in a separate window.
- The following are more commands that are enabled in Express mode:
- Create Component (in place)
- Use the section view command
- Create / Edit Work Features
- Create / Edit Sketches
- Pattern Component
- Copy / Mirror Component
- Assemble
- Point Cloud commands
- Express data now makes drawing views much faster.
Create the joints you need
New context menu options, Between Two Faces and Offset Origin make creating joints easier and more flexible:
- Create a joint origin using Between Two Faces. Specify a virtual midpoint between two faces, by selecting two faces and one point.
- Offset a joint origin using Offset Origin. Drag the manipulator arrows or input offset value to change the Origin location. Pick a reference geometry to align the Origin with.
- You can now align the part orientation by using work geometry. If Align 1 is point selection (sketch point or work point), Align 2 must also be point selection.
Frame Generator
Reuse frame members, and change reused frame members
With Reuse, you can select a source Frame member and reuse it to cut down on the original number of identical files.
- Reuse is available for only straight members.
- To remove a member from a set of reused members, you can right-click it, and select Break Reuse Member.
- If the reuse orientation is not satisfactory, you can use Flip Member Direction.
With Change Reuse, you can switch a reused frame member to another frame member. You can also change the geometry selection, or positional input of a frame member to reuse.
- In the frame reuse workflow, you can window select multiple frame member occurrences.
- To change end treatments on a reused member successfully, apply them to the source member before you reuse.
Get the correct length automatically on double-mitered frame members
For a straight frame member with a miter on each end, such as an angled beam between two opposite inside corners, the correct frame length computes automatically.
Tube & Pipe
Set component opacity in an assembly
A new option, Honor Application Options for Transparency, is added to the Tube & Pipe Settings dialog box. When selected, the option settings for transparency are honored as set in the Application Options dialog box. When not selected, the entire assembly displays as opaque, and avoids the visual confusion that can occur when transparency is active.
Drawing
Fast drawing views for large assemblies
Any Express mode data in an assembly is used to generate faster preview and view placement for both precise and raster views.
Note Legacy assemblies and parts must be migrated to Inventor 2015.
When creating drawing views, if you select the Raster View Only option, views of large assemblies that contain Express mode data generate in a fraction of the time.
Note Significant performance gains are subject to the size of the model and require that both parts and assemblies be migrated to the latest version.
Open drawing files fast
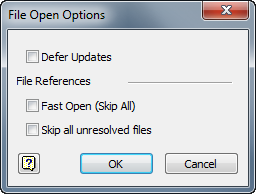
The new Fast Open option in the drawing File Open Options dialog box opens a drawing quickly. When you select Fast Open, no attempt is made to find or resolve any files referenced by the drawing. Once opened, the drawing behaves as though it had been opened with no file references present. You can enter and save edits.
Foreshortened Dimensions
Create linear, angular, or arc length foreshortened dimensions. Run the Dimension command, select two reference lines or edges, or select an arc, and right-click to display the menu. In the Dimension Type list, select the desired type of foreshortened dimension, and place the dimension in the drawing.

Additional Productivity Improvements
Double-click anywhere on a balloon to edit
You can double-click to edit a balloon to override the balloon objects, or to edit or override the value displayed.
Move a split table to another sheet
You can use the browser tree to move split drawing tables (generic, hole table, and parts lists) to another sheet.
Keep your parts list sorted automatically
A new option, Auto Sort on Update, is added to the Sort Parts List dialog box. When selected, your sort settings persist for a particular parts list. The option executes when you click OK in the dialog box. After you turn on Auto Sort on Update, it is not necessary to resort the table manually after you add or remove parts.
Identify drawing view associative sheet reference in View Labels
You can easily find the right sheet when Cut Views (Section/Detail) are moved to a different sheet. View Label Properties now include PARENT SHEET NAME and PARENT SHEET INDEX. The string value updates when the parent view is moved to a different sheet, or when sheet name or index is modified
You activate these properties when you add or edit a view label, and select and and . .
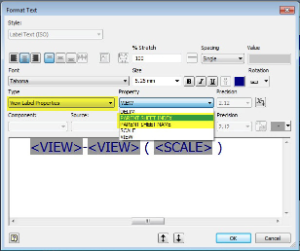
The property is also added to the default view label in the Style and Standard Editor  Standard
  View Preferences
 Display.
 Standard
  View Preferences
 Display.
Communication & Interoperability
Point Cloud Enhancements
In an assembly file, access the Point Cloud commands on the ribbon: Manage tab Point Cloud panel.
 Point Cloud panel.
New commands and functions:
- Navigator
 Navigate to and define the visibility status of scan regions, or scan locations in a point cloud. In the Point Cloud Navigator dialog box, click the
  /
/  icon to switch off and on the visibility of the respective Point Cloud entry.
 - Cloud Plane
 Create a construction plane inferred from a set of points in a point cloud.
 - Attach Point Cloud
 dialog box set the density(level of detail) and maximum loaded points for point cloud
 - Measure the distance from a Point Cloud to a Point Cloud plane and other geometry. Right-click on the Point Cloud .rcp file in the browser, and select Measure
New access to the BIM Simplify commands
You can add the Simplify commands to the Assemble tab and the 3D model tab:
- In an Assembly file: Assemble tab
 Show Panel icon
  and click Simplify.
 - In a Part file: 3D Model tab
 Show Panel icon
  and click Simplify.
Mockup 360 Add-in for Inventor 2015
Mockup 360 add-in is automatically installed with Inventor 2015. It allows you to insert an Inventor model to an existing Mockup 360 file or create a mockup file containing your current Inventor model.
Open a model in Autodesk Inventor. Then on the ribbon, click Autodesk 360  360 panel
  Add to Mockup . Log in to Autodesk 360, install the Mockup 360 application, and set exporting options in the Autodesk Mockup 360 dialog box.
 360 panel
  Add to Mockup . Log in to Autodesk 360, install the Mockup 360 application, and set exporting options in the Autodesk Mockup 360 dialog box.
Configurator 360 Add-in for Inventor 2015
The Configurator 360 add-in to Inventor provides the capability to upload designs directly from Inventor to Configurator 360. On the ribbon, on the Autodesk 360 tab, an icon for Configurator 360 provides quick access to the application. You can add Configurator 360 as a sub-component by selecting the option during your installation of Inventor 2015. If Inventor 2014 is present on your system, Configurator 360 installs for both of the Inventor versions.
AutoCAD Electrical Catalog Browser Add-in for Inventor 2015
You can use the AutoCAD Electrical add-in for Inventor to insert 3D parts by selecting a catalog value from the catalog database. The add-in includes the Catalog Browser interface, the link to the AutoCAD Electrical catalog database, and a small sample set of 3D electrical parts. The Catalog Browser is a modeless palette which means it can remain on the screen while other commands are used.
As you download parts from vendors or create your own parts, you can associate those parts to a catalog value for use within the Catalog Browser. There are two ways to associate a 3D part to a specific catalog value:
- Use the edit mode of the Catalog Browser and enter the 3D part name in the SYMBOL3D column for the catalog value.
- Select the catalog value from the Catalog Browser and browse to a part for insertion. The next time you select this catalog value in the Catalog Browser, the 3D part is available for insertion.
To install the add-in:
1. Install Inventor 2015 completely.
2. After installing Inventor 2015, launch the AutoCAD Electrical 2015 installer.
3. On the Configure Installation screen in the AutoCAD Electrical 2015 installer, select the option Autodesk® Inventor® Electrical Catalog Browser.
To access the Electrical Catalog Browser:
The Electrical Catalog Browser in Inventor is available in both the normal Assembly and the Cable & Harness environments. You can access the command from:
- Assemble tab
 Component panel
  Place drop-down.
 - Cable and Harness tab
 Manage panel
  Import Harness Data:
- In the Import Harness Data, browse to a harness data file.
- In the Imported Harness data dialog box, right-click on an electrical part in the Electrical Parts folder.
Translators
Support for importing the following versions is added. You can now import:
- CATIA V5 version R6 through V5-6R2013.
- Parasolid version up to 26.0.
- JT version 7.0 through 10.0.
- SolidWorks version 2001 plus through 2014.
Support for exporting the following versions are added. You can now export:
- CATIA V5 version R10 through V5-6R2013.
- Parasolid version 9.0 to 26.0.
- JT version 7.0 through 10.0.
CAD Administrator Tools
Enhancements for Materials
New Texture field in Application Options/Files tab
You can now specify a default Texture location in the Application Options dialog box, Files Tab.
Cutout texture improvements
Cutout texture now displays under shaded visual style. The behavior of cutout texture is improved to display the same in both shaded visual style and realistic visual style.
New migration setting for color styles
A migration setting, Migrate color styles to generic, is added to the Material Styles Migration dialog box. When selected, it creates a generic appearance for each color style in the appearance of the Inventor 2012 shaded view color style.
Enhancements for Task Scheduler
Update materials and appearances
In Task Scheduler, in both the Migration task and the Update Design task, you can update materials and appearances in batches, instead of opening the files manually. The option Update Local Materials And Appearances is added to both the Migration Options dialog box and the Update Design Options dialog box. When you select the option, all local materials and appearances are updated automatically to the styles in the library in the active project.
Batch convert all drawing views to precise views
You can convert a batch of raster drawings to precise drawings using Task Scheduler. In the Update Design Options dialog boxes for both the Update Design task and the Migrate Files task, the option Make all Raster drawing views Precise is added.
Note When specifying a folder, the File Name column provides control to filter to the type of files you want to perform the selected task on. It is recommended to select .idw/.dwg when converting raster to precise.
Please note that Skip migrated file and Skip unresolved references will filter these conditions out of the task.
Learning Tools
Inventor Home
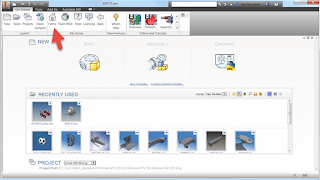
Inventor Home replaces the Welcome screen, and offers a new startup experience focused on common user tasks. The Home screen functions much like your personal dashboard. Some of the features are:
- Basic or full template display.
- Expanded most recently used file list with rich information in the tooltip.
- Filters let you specify the file types to display in the recent file list.
- Ability to pin files you are working on to make them easy to locate. The image above shows two pinned files.
- Fast Access to Team Web, Help, and the Learning path.
Team Web
Team Web is a customizable web page that provides easy access to your own content, processes and procedures.
You can configure Team Web to:
- Link to the HTML page of your choice
- Link to help topics on your intranet
- Link to web based tutorials
- Link to a 3D model download site
- All of the above
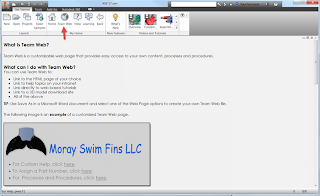
You can start Team Web from multiple locations, including the Get Started tab, My Home panel. An application option in the Files tab lets you to make Team Web the default for the Inventor Home screen.
Tutorial learning path
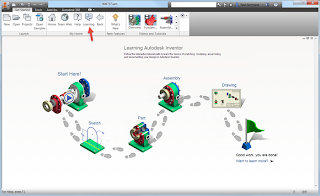
Click the Learning entry on the Get Started tab, My Home panel to access the tutorial learning path. The tutorials provide a guided path to learning the basics of sketches and parts, assemblies, and drawings in a complete end to end workflow. Progress tracking shows what you complete. The enhanced interactive tutorial UI provides a better visual experience.
Search
With a complete overhaul, search now provides results for commands, help articles, support content, and blog, discussion group, and YouTube posts.
Options for access to Help in Inventor
You can now specify whether to access the ONLINE help or the downloaded/LOCAL Help from within Inventor. After you install the local help, you can switch between it and online Help any time. Set the new Help Options in the Application Options dialog box, General tab.


 are added to the ribbon Design tab, Frame panel.
ConversionConversion EmoticonEmoticon